Simulating CISCO ASA 8.4 on GNS3, on Ubuntu is a pain in the ass. Countless QEMU errors ,203 errors, results with no output on console and many more hair-pulling skull bashing events that *will* make you scratch your head and you will be motivated to buy an ASA for your personal use.
 |
| Yes folks..You will be running this..or a cousin of it. |
But fear not weary travelers if you have reached at this point of web while surfing (read:hunting) for your share of ASA & firewall stuff, you are right at home. Today I will be providing a step by step almost error free guide of simulating ASA, and fret not, this has been tested on more than 5 platforms with zero error rate (and that included machines of different platform - i386,x86_64; and different flavors of Fedora/Ubuntu).
NOTE: I love linux but I hate Ubuntu, for my own personal reasons. I am a fedora guy & I love debian, but I hate Ubuntu.
Why I didnt covered this guide for Fedora as Fedora guys will figure out how to do it anyways :P , its Ubuntu ones who were facing maximum issues (just google it) and hence I wanted to cover a guide for it. Jokes aside, I intend to cover the subjected issue as I faced multiple issue myself.
Never-mind, my machine as of now is an amd64 E350 based HP dm1 3210 Laptop with 4 GB ram. Its a pretty under powered PC for running GNS3 (as compared to dedicated rigs I have seen, however I can run IOU & NX-OS Titanium over it and it balances every known equation for me) but it does the job with some tweaking and the result is very satisfactory.
Coming to the point, you will be needing -
- A laptop/desktop
- Any Ubuntu flavor installed (I use backbox, its better than backtrack)
- ASA 8.4.x files (initrd and kernel files, if you are reading this article, I know you have them)
- Patience.
Step 1 - Installing GNS3 Well this is simple, just type the commands and it will install safely. Make sure you dont have GNS3 installed previously else you might face some issues. Please note I am using compiling GNS3 for my 64 bit OS, however it should work for 32 but laptops too, make sure you choose correct version of dynamips from GNS3 website.
rishabh@xion$cd /opt
rishabh@xion$sudo mkdir GNS3
rishabh@xi0n:/opt$ wget http://sourceforge.net/projects/gns-3/files/GNS3/0.8.3.1/GNS3-0.8.3.1-src.tar.gz
rishabh@xi0n:/opt$ unzip GNS3-0.8.3.1-src.zip
rishabh@xi0n:/opt$ sudo mv -f /GNS3-0.8.3.1-src/* /opt/GNS3
rishabh@xi0n:/opt$ sudo chmod 777 GNS3
rishabh@xi0n:/opt$ cd GNS3
rishabh@xi0n:/opt/GNS3$ sudo mkdir Dynamips Images Project Cache tmp
rishabh@xi0n:/opt/GNS3$ sudo chmod 777 Dynamips/ Images/ Project/ Cache/ tmp/
rishabh@xi0n:/opt/GNS3/Dynamips$ cd Dynamips/
rishabh@xi0n:/opt/GNS3/Dynamips$ http://sourceforge.net/projects/gns-3/files/Dynamips/0.2.8-RC3-community/dynamips-0.2.8-RC3-community-x86_64.bin
rishabh@xi0n:/opt/GNS3/Dynamips$ export PATH=$PATH:/opt/GNS3/GNS3-0.8.3.1-src/
Check if its installed by opening a terminal window and running GNS3. If it went well, proceed to next step.
Step 2 - Compiling and Patching QEMU This is the second most crucial step, do as instructed, by the time you are finished, you will be presented with a stable installation of patched Qemu. Make sure NO previous installation of Qemu in installed on your machine.
rishabh@xion:/opt/GNS3$ wget http://download.savannah.gnu.org/releases/qemu/qemu-0.11.0.tar.gz
rishabh@xion:/opt/GNS3$tar xvzf qemu-0.11.0.tar.gz
rishabh@xion:/opt/GNS3$cd qemu-0.11.0
rishabh@xion:/opt/GNS3/qemu/qemu-0.11.0$wget http://downloads.sourceforge.net/gns-3/qemu-0.11.0-olive.patch?download
rishabh@xion:/opt/GNS3/qemu/qemu-0.11.0$patch -p1 -i qemu-0.11.0-olive.patch
rishabh@xion:/opt/GNS3/qemu/qemu-0.11.0$./configure --target-list=i386_softmmu
rishabh@xion:/opt/GNS3/qemu/qemu-0.11.0$make
rishabh@xion:/opt/GNS3/qemu/qemu-0.11.0$sudo make install
Once its installed, check by running
rishabh@xi0n:/opt/GNS3/qemu/qemu-0.11.0$ which qemu
/usr/local/bin/qemu
It should display Qemu path, if not, you screwed up some where. Do it again.
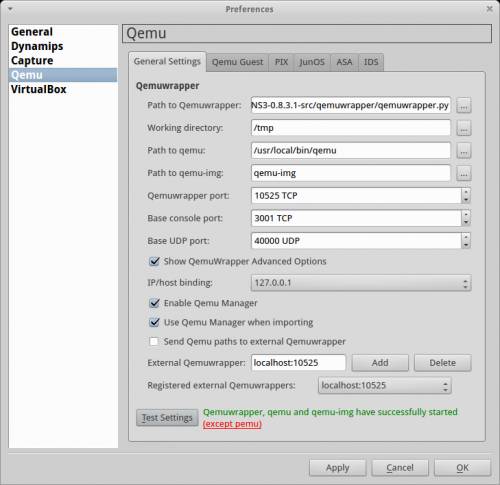
Step 3 - Preliminary Configuration In general settings of GNS3, you will find Qemuwrapper is already configured, double check Qemu & Qemu-img path here, it should be the same as mentioned in "which" command output or better if you have placed the same it in GNS3 folder
Also, Set ASA options as
Qemu Options:
-vnc none -vga none -m 1024 -icount auto -hdachs 980,16,32
Kernel cmd line:
-append ide_generic.probe_mask=0x01 ide_core.chs=0.0:980,16,32 auto nousb console=ttyS0,9600 bigphysarea=65536
Browse to the initrd & kernel images of ASA and set memory to 1024, once done, save it.
make sure your configuration looks like this
When done, its execution time follks :)
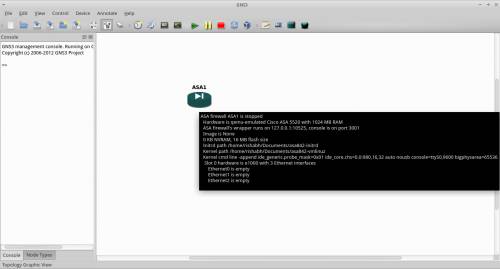
Step 4 - Running it. Well..it will look like this.
You can also check the ps output of Qemu (quick and dirty output here..nothing flashy)
rishabh@xi0n:/opt/GNS3$ ps ax | grep 'qemu'
7094 pts/0 Sl+ 0:00 /usr/bin/python /opt/GNS3/GNS3-0.8.3.1-src/qemuwrapper/qemuwrapper.py --listen 127.0.0.1 --port 10525 --no-path-check
7101 pts/0 SN+ 0:00 /bin/sh -c /usr/local/bin/qemu -name ASA1 -m 1024 -hda "/tmp/ASA1/FLASH" -kernel "/home/rishabh/Documents/asa842-vmlinuz" -initrd "/home/rishabh/Documents/asa842-initrd" -append "-append ide_generic.probe_mask=0x01 ide_core.chs=0.0:980,16,32 auto nousb console=ttyS0,9600 bigphysarea=65536" -net nic,vlan=0,macaddr=00:00:ab:40:a4:00,model=e1000 -net nic,vlan=1,macaddr=00:00:ab:8d:12:01,model=e1000 -net nic,vlan=2,macaddr=00:00:ab:f0:c0:02,model=e1000 -serial telnet:127.0.0.1:3001,server,nowait -vnc none -vga none -m 1024 -icount auto -hdachs 980,16,32
7102 pts/0 R+ 0:19 /usr/local/bin/qemu -name ASA1 -m 1024 -hda /tmp/ASA1/FLASH -kernel /home/rishabh/Documents/asa842-vmlinuz -initrd /home/rishabh/Documents/asa842-initrd -append -append ide_generic.probe_mask=0x01 ide_core.chs=0.0:980,16,32 auto nousb console=ttyS0,9600 bigphysarea=65536 -net nic,vlan=0,macaddr=00:00:ab:40:a4:00,model=e1000 -net nic,vlan=1,macaddr=00:00:ab:8d:12:01,model=e1000 -net nic,vlan=2,macaddr=00:00:ab:f0:c0:02,model=e1000 -serial telnet:127.0.0.1:3001,server,nowait -vnc none -vga none -m 1024 -icount auto -hdachs 980,16,32
7175 pts/1 S+ 0:00 grep --color=auto qemu
Once you are up and running, its time to grab a can of redbull (or beer if you prefer) and get a pat on your back, good work soldier :)
Miscellaneous Errors , which you *just might* encounter and how to deal with them. If you followed my steps, I dont think you will encounter any errors, but for the sake of completeness, I am including the most basic errors which you might get.
"qemuwrapper path doesn't exist" This one is a classic one. With proper GNS3 0.8.3x installation, you will *not* encounter it. If you are running classic 0.7.x build, God save you. Even if you have 0.8.3.x & still get this error , find Qemuwrapper (it will be there in one of GNS3 source folders) and select it, save it. Error gone. Make sure permissions are correct.
"203-Bad number of parameters (5 with min/max=6/6)" Upgrade your GNS from 0.7x.x to 0.8.3, if you are following this guide, you should not get this error.
"You are running an old and unpatched version of qemu" Now here things get interesting. In one case I installed Qemu before installing GNS3 and I got this error quite frequently. I uninstalled Qemu, cleared my /tmp & I then first installed GNS3 and then installed Qemu after configuring GNS3 fully (except the Qemu part that is) . Did a sudo make install for Qemu and restarted my laptop. Please note I am using Qemu 0.11
Ran GNS3 and tada..
This error will be rectified.
"You must use 'manual mode' to connect a link with a xyz module" Simple as hell, use manual mode..duh..
"QEMU boots but no ASA boot output on console" Use correct QEMU binary, no Qemu_i386 / Qemu_x86_64. Use only correctly patched Qemu 0.11 binary in GNS3 like previously specified.
In all cases, all errors are either will be some permutation or combination of the mentioned ones. Well , it summarizes my post on running ASA, hope it will help you.
Rishabh Dangwal